Pixar Short: Luxo Jr. HD
http://www.youtube.com/watch?v=zmhZm5FRV4s
I find this video interesting and cute. In this video, is about animation of 2 table light - a big and small one, playing around balls - small and big. What makes this video interesting is because, the way it is animated, it brings out a story.
For example, in the picture above (0:23), the way it is animated seems that the table light is "looking" at the small ball in a curious way. As if the table light is saying "What is this?", as the big table light is blending down and looking at the small ball in a funny way.
Also, in the picture above (1:02), the small table light is hopping on top of the small ball happily, it keep jumping non-stop. While the big table light is looking at the small table light, in a curious? envy? way, as if it can't wait for it turn to play with it.
The sounds played at the background also play a important part to the video. It make the video look more interesting and also the sounds played at the background are matching with the action of the table lights. For example, in 1:05, when the small table light burst the small ball, it give off the air-busting sound which allow the user to hear and understand that the ball is burst.
To conclude this exercise, I understand that in Maya, we can also do animation and we can do something similar to what we had seen in this video. This video might be short, but it can be seen that there are a lot of efforts used to do the animation. From modelling to rendering and sound etc, I hope that in future, I will be able to do such animation video in Maya as well!
Tuesday, 29 January 2013
Saturday, 19 January 2013
Week 12 Exercise 2
1)Do you need to be able to draw well to create good 2D animation? Explain your view.
We do need some drawing skills (doesn't have to be extremely good in drawing) to create a good 2D animation. As by drawing the model out, we will understand the model more and also be able to visualize the model out.
2) Do you need to be able to draw well to create good 3D animation? Explain your view.
Similarly to question 1, I think that we do need to have some drawing skills to create a good 3D animation, to help us to visualize the model. As it can helps us in knowing better of which shapes to use or what techniques skills to use. But we do not have to draw really well to create a good 3D animation, just being able to draw out the basic outline of the model will do.
3) What do you think would separate a piece of poor animation from a piece of good animation? In other words, how would you go about deciding if a piece of animation is good or bad?
I think the most important point in judging a piece of poor animation and a piece of good animation is the realism of the model. If the model look realistic and look as real as the object model itself, it is counted as a piece of good animation. As it will be able to let the user recognize the object instantly without having any doubts.
4) In 2D animation, you need to be very aware of timing at a frame by frame level, using timing charts and other techniques - but for 3D animation, this is handled using the graph editor, which is more concerned with manipulating rates of change over time.
Does this affect how you approach your animation work? Explain.
It does not affect much when I am approaching my animation work. The graph editor helps us draw the arcs and curves, but definitely we still need to change the graph by using the tangents available to make it look perfect. Also, we still need to key in key-frame in specific timing which means frame-by-frame basis is still being used. So overall, it did not make much changes.
5) Give a brief critique of Maya as an animation tool. Don't just say Maya makes animation difficult, or easy, or that you need to learn a lot of stuff to use Maya - explain what Maya does well and not so well in terms of creating animation.
Maya is a good animation tool, it might seems hard to use at first but as you get to learn about the basic of Maya, it is quite easy to use and adapt to it. Also, Maya does a good job in creating animation by having convenience technique for us to use when we are creating the model. For example, the graph editor. By just seeing the graph editor and adjust the tangents accordingly, we can make the model's movement look more perfect and realistic.
However, in Maya, when we are creating more complex model, it is difficult for us to do it in Maya. One of the problem we faced, is regarding the shapes. As there are only limited shapes available for us to use, some shapes that we need does not include in Maya so we can only have to find similar or close to shape to replace it which change the original form of the model.
Week 11 Lab 2
1) Why is squash and stretch so useful in animation?
By having squash and stretch, it add on a more realistic feeling to the bouncing ball which shows that it is really bouncing off the ground. Without the squash and stretch, the bouncing ball will just look like a stiff metal ball jumping (not bouncing) around as only a metal texture ball won't be able to squash and stretch.
Without the squash and stretch effect
With the squash and stretch effect
2) Think of a situation in which extreme squash and stretch could be applied to a character - try to be original.
Extreme squash and stretch could be applied to a character that is being slapped. As when one person is being slapped, the face will first be squash, it happened as when the hand using force to smack the face. Then it will stretch after the slap as the skin will stretch back to it original form.
3) Think of an animation example where squash and stretch would NOT be appropriate
Like I mentioned in question 1, metal texture item would not be appropriate for squash and stretch as it is not flexible and cannot be blend! Same goes to all the hard materials, example: Steel, wood, glass etc.
4) If squash and stretch doesn't really happen so obviously in real life, why do you think is it so effective in animation?
Squash and stretch doesn't really happen so obviously in real life because it happened too fast, so we are no able to see. But it is effective in animation because in animation, it was played in a slower speed also, in animation it create a illusion that gives off a realistic feeling to the user.
Week 11 Lab 2
First, we create the polygon sphere then at the main tab click on Window -> Outliner and ctrl+g twice.
Then renamed the groups names to prevent confusion and enable us to recognize which is which.
Next, select the translate_ball_gp group and Create Deformer -> Nonlinear -> Squash. If you did not see the Create Deformer in the main menu tab which means you are not in the Animation module. So change it to Animation module before this step! If you have done this step correctly, you will see handle named “squash1Handle” created (in the Outliner).
Then, we will parent the squash1Handle to the translate_ball_gp group. Firstly, select the handle, then press control and select the translate_ball_gp group in the Outliner. Next, press the p key(release control) to parent the handle to the group. If you have done this step correctly, it should look like what is shown in the image I included above.
The next step will be locking up the channel attributes as we do not want any changes made and to also avoid accidentally changes.
To lock the channel attributes, select the wanted ones by using the shift or control and the left mouse button (LMB). Then right mouse click and a long list of selection will
appear. Choose the Lock Selected.
This action will lock all the selected channels and no change can be done to
them.
If you have done this step correctly, the locked ones will be in blueish color while the unlock ones will be in red color. It should look like what is shown in the image I included above.
The next step will be mainly changing the factor value (at the squash1Handle) at different time of the timeline to change the effect to squash and stretching to the ball. To insert timeline, click on s.
A positive value in the Factor will create an
exaggerated stretched
ball.
A negative value in the Factor will create an
exaggerated squashed ball.
As the ball falls to the ground, it will
be stretched by gravity. As the ball hits the surface, it will be squashed because of
the impact on ground. To let the ball regain its normal shape, the
squash1Handle’s Factor is 0.
Rotation the value of the ball to point your stretched ball in a
particular axis (in this case, the Rotate Z value) so that it would seemed to
be bouncing in a stretched manner towards that direction.
Lastly, to animate the Rotation of the ball, select the rotate_ball_gp group. At Frame 1, set a keyframe with the Rotate Z value of 0. Then set a keyframe at Frame 100 with a Rotate Z value of -1200.
Extra : I changed the ball color and put in color for the plane by right-click on the object and click on assign new material -> lambert.
To conclude this exercise, it is more tedious then Week 11 Lab 1 exercise, it is more challenging and I have to extra careful with the timeline and all the numbers. Also, I often make the mistake of not keying s after the challenges I made in the values.
Friday, 18 January 2013
Week 11 Lab 1
When we first open the Keyframing.mb file, this is what the file had already included.
The tennis ball and the tennis court. To make the tennis court bigger, we change the pPlane1; scale x, y and z to 100, in order to let the green plane occupy the whole screen.
Next, we will adjust the tennis ball. At different timeline, we change the value of translate x and y accordingly to have the effect of the ball bouncing up and down.
Translate x set the tennis ball movement front or back. The higher the value, the tennis ball move nearer to the end of the tennis court, similarly, the lower the value, the nearer to the start of the tennis court.
Translate y set the tennis ball closeness to the ground. The higher the value, the tennis ball further to the ground, similarly, the lower the value, the closer to the ground.
To key in into the key-frame press s after setting the value of translate x and y at the channel box/layer editor.
Be careful of the timelines we picked on as we won't want the ball to jump too slow or too fast. It have to look real and realistic so we have to try and error the different timeline!
The tennis ball bounce up.
When the tennis ball is bouncing up, the translate y value should be high so as to stay away from the ground.
The tennis ball bounce down
When the tennis ball is bouncing down, the translate y value should be low so as to be near to the ground.
Single bounce
Double bounce
Overall, this exercise is fun and interesting as this is our first time making a video out of Maya! Also, the exercise is manageable as there are step-by-step tutorial available! Lastly, I feel that this exercise make us realized there are a lot more we can learn and do in Maya!
Sunday, 6 January 2013
Week 7 to Start of Term 2
Project 1 – Part One
1.
Story
The object that I modeled is Ferris
wheel.
The story is about a rat racing around a
track on a mousetrap car. In the middle of the track, the ferries wheel will be
place there.
The rat has to go pass the Ferries wheel
in order to continue the race. As the rat enter in the Ferries wheel at the
front, it will turn one round of the Ferris wheel and then back to the base of
the Ferris wheel where the rat will exit. After the rat exit the Ferris wheel,
it will continue the race and complete the track racing.
The purpose of the Ferris wheel is to
acts as a road block so that it will be more difficult and challenging for the
rat to complete the race. As the Ferris wheel is placed at the middle of the track,
there is no way that the race can avoid it. So in order to complete the race,
the rat has to go through the Ferris wheel.
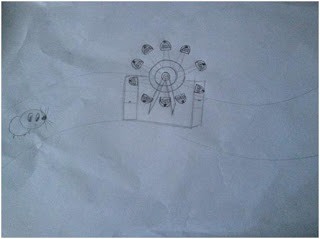
Diagram
on the rat race
2.
Shape
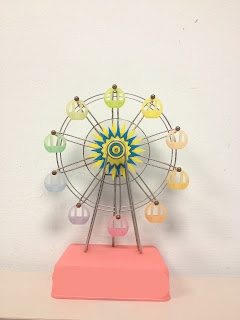
My toy model – Ferris wheel
For my toy model, it is mainly made up
of circles, cylinders and torus. As the Ferris wheel are made up of repeated
shapes. For example, the cabins so we can just create 1 cabin and just
duplicate it. Then using the move tool, shift and rotate the duplicate shape to
place it in the right place.
Parts
of the Ferris wheel
The
cabins of the Ferris wheel have windows so we have to extrude it. First, we
create a circle then we use cube to extrude the windows out.
Also you can see from the picture, the cabins
color is not strong, is more like a transparent color so, we just have to
adjust the transparency level.
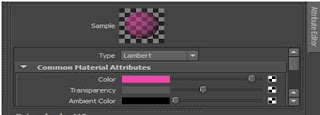
Maya
– Common material attributes
3.
Design
Drawings
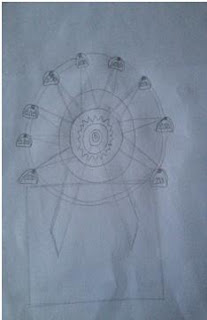
Front view of the
Ferris wheel
Front view of the
cabin
Maya Progress
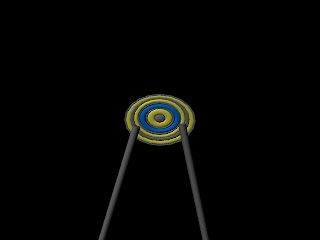
1st week – Axis of the
Ferris wheel
2nd week – Building up of
the Ferris wheel without the base
3rd week - Front of the
Ferris wheel, without coloring
4th week – Front of the
Ferris wheel with coloring
5th week – Back of the
Ferris wheel
5th week – Side of the
Ferris wheel
4.
Research
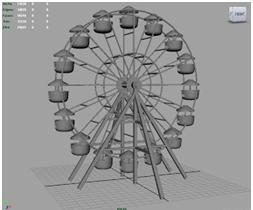
Before coloring
After coloring
Leo Tsang also created a Ferris wheel
model on Maya. Similarly, he had duplicated the various shapes throughout the
model to form the Ferris wheel. Also,
texturing was involved to make the model to look more real by adding texture
and colors to it.
He not only models the Ferris wheel, he
also makes the Ferris wheel to be able to rotate, using grouping and centering
pivot point of the main wheel. This makes his Ferris wheel look realistic.
Which is more advance and I can try to do the same if I’m done with the
modeling of the Ferris wheel to challenge myself.
5.
Self-Critique

Original model
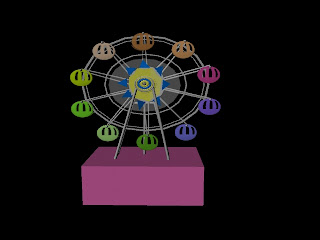
Maya model
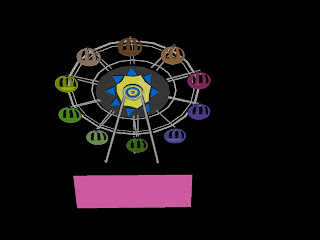
For my final model, I think that it look
quite similar to the original model. The Maya model is not exactly the same as
the original model but it gives off similar impression of the original model.
The main problem I have when I am doing
the Maya model, is the shape of the cabins, the base and the middle pointy
shapes. Other than these problems, I found the rest of the modeling process is
manageable.
Below, I will further elaborate on the
success and problems I faced.
Left
- Original, Right - Maya cabins
As you can see from the left picture,
the original cabins are made up of a flat-looking base. It seems to be made up
of a rectangle as a base and circle at the top. But for my Maya cabins, I only
used circle shape to make it which is not quite similar to the original ones. However,
for the Maya windows are quite similar to the original windows of the cabins.
Left
- Original and Right – Maya, Back of the Ferris wheel
In my Maya Ferris wheel cabins, I used
up similar color in compared to the original Ferris wheel. Also, the number of
cabins (10) I made in the Maya is the same number of cabins (10) in the
original. In order to make the Maya model as realistic as the original model,
we have to include all the details available.
Left
- Original and Right – Maya, Detail of the back of the Ferris wheel
For example, for the back of the Ferris
wheel, I also do it as the same as how the original model is. It is important to
be as detailed as possible as if I did not do the back stander in Maya, it will
not make sense. As there have to be a back stander to support the Ferris wheel.
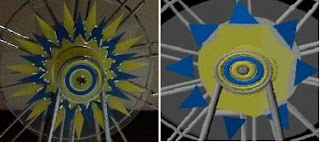
Left - Original and Right – Maya,
Middle pointy shapes
This is the most difficult part of the
modeling. I used the concept we learnt in the Gear exercise (Week 2 Lab 2 Part
2). First, I create a pipe then adjust the size I want it to be. Right click it
and click on Face, click on the sides of the pipe to extract the pointy shape
out. It is not quite successful but I managed to make slightly pointy triangles
shape out. The reason why it was not successful as when we are doing the Gear
exercise, the size we extracted is rectangle which is much easier to adjust the
shape out.
The second challenge I faced for this
part is after I am done with the Gear part, I have to do blue shapes and
diamond (yellow) shapes out. It is extremely difficult to create the shape as
well as alight it accordingly as it is in the original model. After much
trying, I am still not able to do it hence; I replaced it with a basic triangle
shape.
Conclusion
To conclude, after doing this project,
it let me have a better understand of how to use certain tools in Maya. It also
gives me more chances to try out different tools and give me more experience to
use it.
Also, by doing this project, it make me
realized that, items that we see daily, can be model in Maya as well. It also
make me realized that, we are capable to model those cartoons characters we see
in movies which makes me feel more interested in 1N3D as there is so much more
we can do in this subject.
Project 1 – Part Two
Bonus
Extras
1) Lighting
2) Texture-Mapping - Rust Metal
Front
view of texture-mapping
Back
view of texture-mapping
Subscribe to:
Comments (Atom)


.jpg)
.jpg)
.jpg)
.jpg)
.jpg)
.jpg)
.jpg)


